How to Fix the Selected Boot Image Did Not Authenticate Error
Summary :

Hewlett Packard (HP) is one of the best computers, and like any other computer, it has a BIOS that loads devices and the system after checking for errors. But sometimes, the “selected boot image did not authenticate.” error will occur. You can go to MiniTool to get the methods to fix it.
Selected Boot Image Did Not Authenticate
This error means that the security protocol was violated after checking the firmware database or the device from which the operating system was loaded could not provide the information needed for security to boot. This error can also mean that your boot loader information is missing, therefore, the operating system could not be loaded.
Here are three reasons for the “selected boot image did not authenticate” error.
1. This error occurs if your computer changes the boot order.
2. The boot image can become corrupt after an update or due to a malware attack.
3. Changes can happen due to the installation of new devices,
4. Upgrade/changes on the operating system (which changes the boot loader information).
How to Fix the “Selected Boot Image Did Not Authenticate” Error
Method 1: Change from Secure Boot to Legacy Boot in Your BIOS Settings
You should change from Secure Boot to legacy boot in your BIOS settings. If you are sure that your computer cannot complete the start because of the virus or malware attack, then you can’t use this method; use method 3 instead. Here are the steps.
Step 1: You should enter the BIOS, read this post – How to Enter BIOS Windows 10/8/7 (HP/Asus/Dell/Lenovo, any PC).
Step 2: Press F10 to open the BIOS Setup when the Startup menu displays.
Step 3: Choose the System Configuration menu with the right arrow key, then select the Boot Option and press Enter.
Step 4: With the down arrow key, select Legacy Support and press the Enter button.
Tip: If it is disabled, you should select Enabled and press Enter.
Step 5: Then select Secure Boot and press Enter, then select disabled and press Enter.
Step 6: Press F10 to accept the changes and select Yes and press Enter.
The computer automatically reboots to Windows. Then you can check if the “selected boot image did not authenticate” error has been fixed. If not, you can try the next method.
Method 2: Hard Reset Your Computer
The second method is to hard reset your computer, which will reset all the configurations on your BIOS (apart from passwords) and allow the new configurations operating system changes and hardware changes on the next boot. Here is how to hard reset the HP computer.
Step 1: Power off your computer and unplug the AC adapter cable. Then remove your battery.
Step 2: Press and hold the power button for at least 20 seconds.
Step 3: Press the F2 key to power it back.
Step 4: Run the startup test.
This will test all the hardware in the system and detect any problems. Then restart your PC if the test comes out clean.
Method 3: Use System Recovery to Repair Your Computer
Then you can try using system recovery to repair your computer. Here is the tutorial:
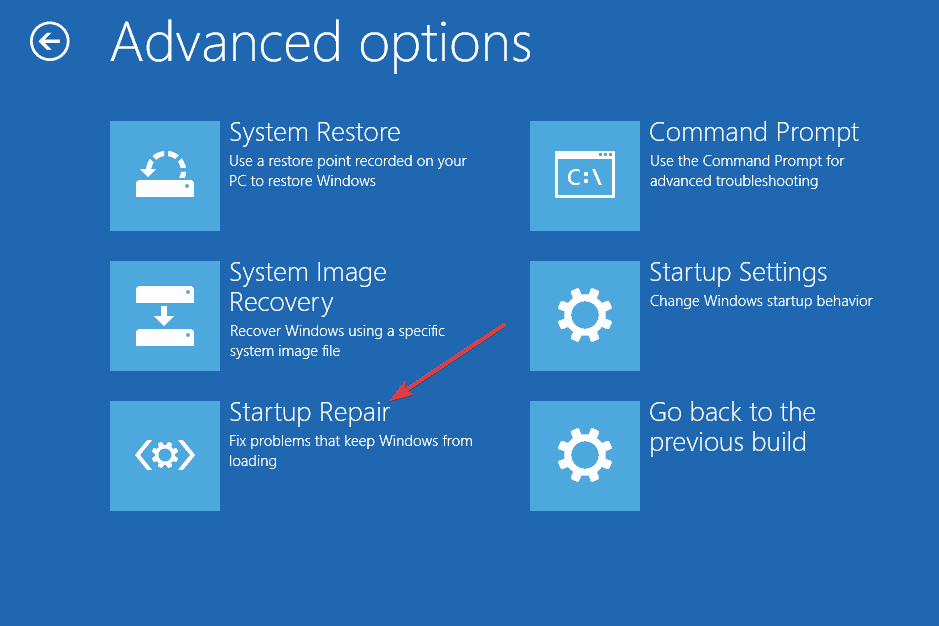
Step 1: In the Start menu, press shift and click restart at the same time to enter the WinRE.
Step 2: You should choose Troubleshoot in Choose an option, and then choose Advanced options.
Step 3: Choose Startup Repair in Advanced options.

Accept the repair process and wait for the repair to complete and restart your PC. Here is all the information on how to fix the “selected boot image did not authenticate” error.
Final Words
This post has told you the meaning of “selected boot image did not authenticate” error, the reasons for it occurring on your HP computer and the methods to get rid of it so that you can continue with starting up your computer.
- Share CrocoBlock key trọn đời Download Crocoblock Free
- Cung cấp tài khoản nghe nhạc đỉnh cao Tidal Hifi – chất lượng âm thanh Master cho anh em mê nhạc.
- Giải thích câu tục ngữ Đói cho sạch, rách cho thơm – Trường THPT Thành Phố Sóc Trăng
- Hack Tập Kích v4.9 mod full kim cương, auto headshot cho Android
- Cách tạo ghi chú trên màn hình desktop Windows 10 cực đơn giản – Thegioididong.com
- Cách khắc phục lỗi không hoàn thành thiết lập Touch ID – friend.com.vn
- Hướng dẫn phá Pass Winrar Online qua Passwordrecovery
Bài viết cùng chủ đề:
-
Hỏi đáp: ăn chay ăn trứng gà công nghiệp có được không
-
Sửa lỗi mã hóa ký tự bị hỏng, bị lỗi trên Word 2019, 2016, 2013, 2010
-
10 Chuyện Tâm linh có thật – Nơi thế giới vô hình huyền bí
-
100+ Hình nền, ảnh Anime nữ cute girl, dễ thương máy tính, điện thoại
-
Hướng dẫn xử lý lỗi iphone 6 plus không nhận vân tay
-
Perfect Money là gì? Hướng dẫn sử dụng PM mới nhất 05/10/2021
-
Làm Sim Sinh Viên,Chuyển đổi gói cước Viettel,Vinaphone,Mobile tại simredep.vn
-
Bí quyết bắt Pokemon không cần di chuyển
-
Những phim có cảnh sex trần trụi bị cấm phát hành trên thế giới
-
Mạch đếm sản phẩm dùng cảm biến hồng ngoại – Học Điện Tử
-
6 Mẹo dân gian chữa rướn ở trẻ sơ sinh khi ngủ tự nhiên an toàn
-
Sao kê tài khoản ngân hàng ACB-những điều cần biết
-
Acer Iconia B1-723 – Chính hãng | Thegioididong.com
-
Cách khắc phục lỗi Voz không vào được bạn không nên bỏ qua
-
Tắt mở màn hình iPhone cực nhanh, không cần phím cứng – Fptshop.com.vn
-
[SỰ THẬT] Review bột cần tây mật ong Motree có tốt không?


